How To Grow Marrowfat Peas
How to grow Marrowfat Peas, the preferred pea seed for Mushy Peas:
Thomas Jefferson was known to plant Marrowfat Peas regularly at his Monticello estate. Whether or not he turned them into our favorite mushy pea recipe or how he ate them, we’re not sure.
STEP 1: Find a source for Marrowfat Pea Seeds such as the ones listed on this site.
STEP 2: Soak the beans to get them started: Your stash of dried marrowfat peas will be very dry when you remove them from the package. It is recommended to soak them in filtered water overnight for 12 hours. In most cases the pea seeds will not germinate properly without pre-soaking. However, make sure to not leave them soaking longer than that, as this is longest they will go without air before drowning.
STEP 3: Plant your marrowfat seeds in a pot of compost, about 2″ (5cm) deep. If the weather is cool, put the planted compost in a loosely tied bag which will act as a mini-greenhouse and the seeds should germinate faster. When the pea shoots are about 1/2″ to 1″ (1 – 2cm) tall, remove the plastic.
STEP 4: Soil Preparation: While this is optional, preparing your soil in advance will increase your yield and improve the taste of your marrowfat peas. About 4 weeks before planting or sowing, add mature compost and composted manure into your soil to a depth of about 9 in. (23cm). About one bucket per square yard should do it. Two weeks before planting, mix in a top layer of fish manure or organic bone meal. If that isn’t available, mix in 2 oz.(60g) of carbonate of lime and 1 ounce (30g) of sulphate of potash per each square yard. The more tilled the soil, the better.
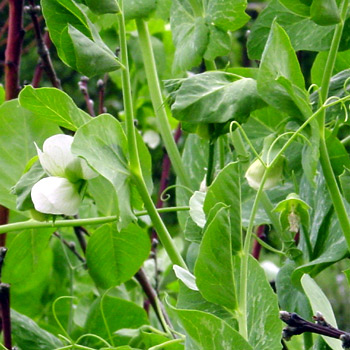
STEP 5: Plant your pea seedlings and rejoice! Pick a garden location where the ground has been well tilled so as to provide improved aeration. Also worth noting, that peas should not be grown within the same soil plot as the previous year. Peas should be rotated. Plant the seedlings with at least 3 inches. (76mm) of space between each pea plant.
STEP 6: Stake your pea shoots for climbing: As your future mushy peas get taller make sure to stake them, so they will be encouraged to climb. It is not necessary to add fertilizer because peas store Nitrogen from the air within their roots, however, adding nutrients and fertilizer may help if the soil is deficient. Especially if you have pre-conditioned your soil, adding anything at this point would be unnecessary. Another option for climbing is plastic or cloth garden netting. At the end of each row of pea plants, hammer in posts into the garden. Then, between the posts attach string or wire and attach garden net the full length of the row. Garden net is like instant trellis without the work of building it! Sometimes it is called trellis net, bird netting, bird block, deer block or garden fence. My favorite is the Luster Leaf Trellis Net made from strong cloth. Here are three great choices:
STEP 7: General Care for your Peas: As soon as the pea flowers begin to appear the peas should be given adequate water so that the pods will grow into plump and juicy peas. Sufficient water will also prevent peas having stunted growth in addition to smaller flowers and yield. Regular mulching is a good idea to help retain moisture and increase soil aeration.
STEP 8: Harvesting your delicious Marrowfat Peas: Pick the pea pods frequently when ready, which will encourage even more pod growth. In most cases, pick the peas close to the time that you intend to cook them. This will retain their sweetness. When your marrow peas have finished bearing fruit, cut off the pea stems and use them for compost. Also, don’t pull out the roots – allow them to remain in the soil so they will release the stored nitrogen back into your soil. To harvest for storage, allow the beans to dry on the vine. When fully dry and the husk begins to crack open, harvest all your peas and separate the husks. The marrowfat pea seeds are now ready for kitchen storage, or to grow again next year!
Comments are currently closed.